Today I want to offer you a simple recipe for rye bread in a bread machine. From these products it comes out weighing about 960 grams, if this is too much for you, make half a serving. Homemade rye bread with malt in a bread machine turns out much tastier than store bought, so I advise you to try it. If desired, the same can be baked in the oven, but then you need to knead it with your hands and make a dough first.
I also want to note that I make exactly rye wheat bread in a bread machine, because if you make it with only one type of flour, it won’t be as tasty. My mother simply loves this kind of bread and bakes it quite often, and she also really likes this recipe. This recipe for rye bread with malt in a bread machine; in fact, buying malt is not difficult, since it is sold in many grocery supermarkets.
Bread recipe from rye flour in the bread maker has recently become more popular, since it is less calorie and such bread is suitable for those who are watching their figure and do not eat a lot of flour. Additionally, I advise you to look, but it is baked in the oven, it turns out soft and tasty.
Ingredients:
- Dry yeast – 2 tsp
- Wheat flour – 225 g
- Rye flour – 325 g
- Salt – 1.5 tsp
- Refined vegetable oil – 2 tbsp
- Rye malt – 40 g
- Boiling water – 80 ml
- Honey – 2 tbsp
- Ground coriander – 1 tsp
- Water – 330 ml.
The calorie content of rye bread is 208 kcal per 100 g.
How to bake rye bread in a bread machine
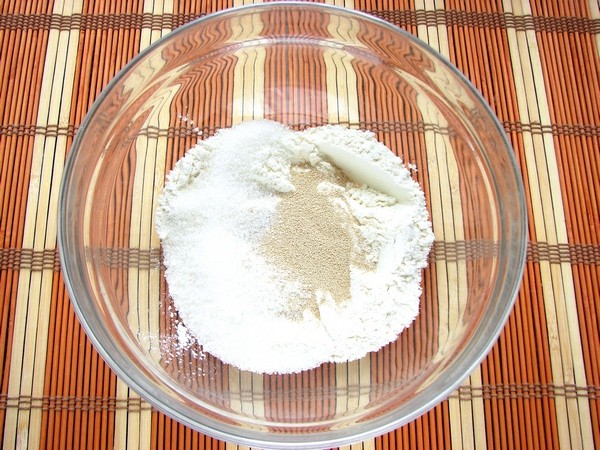
The recipe for rye bread for a bread machine is simple, but it is important to do everything one by one. So, first of all, I put it in a bowl rye malt and pour boiling water over it, stir and leave to cool. Next, I pour the yeast into a special bucket, always dry. It is important that they are fresh and must be stored hermetically sealed, otherwise your baked goods may not rise.
 Since I make wheat rye bread in a bread machine, I sift two types of flour into a bowl and then carefully pour it into a bucket on top of the yeast.
 On top of the flour I put salt, refined vegetable oil, cooled malt, honey and coriander. If desired, honey can be replaced with sugar, depending on your taste.
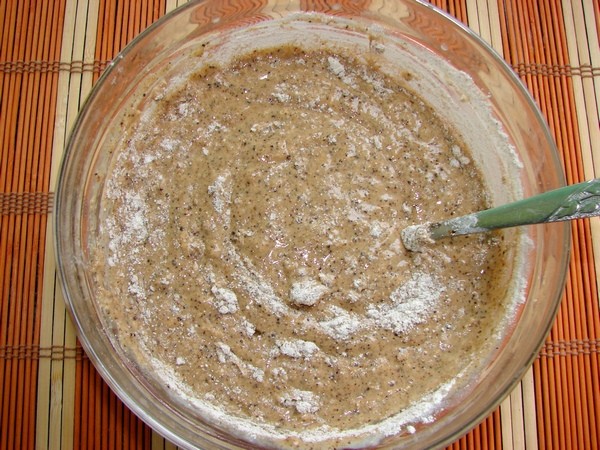
 I carefully pour the last water over all the ingredients.
 I place the bucket in the bread machine, select the program “ Rye bread" and start. It is important that there is no flour or other products on the walls of the bucket; if it gets dirty, it needs to be wiped.
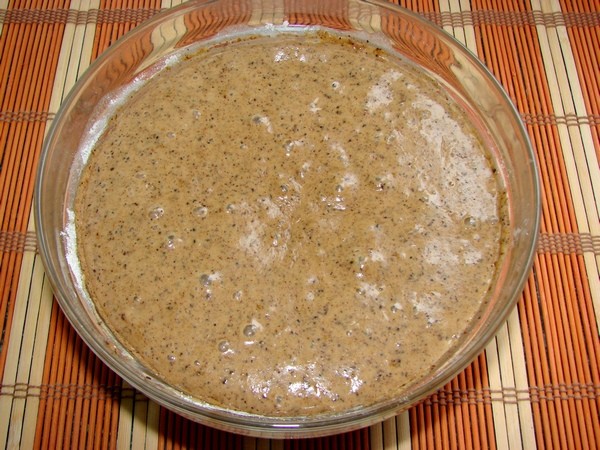
 Next comes the simplest part: baking rye bread. My “Rye Bread” mode does not offer a choice of crust and size. The total cooking time takes 3 hours 30 minutes, of which about 45 - 60 minutes of proofing, 10 minutes of kneading and at this stage I adjusted the dough a little by hand - using a silicone spatula I removed the unmixed dough from the walls of the bucket. At the same time, at the end of the kneading I evaluate the bun, the dough turns out soft, sticky, but holds its shape. Next, according to the program, the dough rises and then you cannot open the lid, so as not to spoil the future loaf.
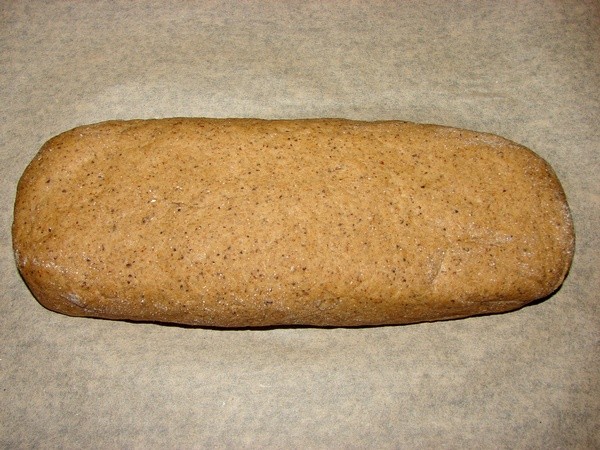
 When the rye flour bread is baked in the bread machine, a signal will sound that it is ready. Next, I press the stop button and immediately take out the bucket. Then I carefully place the bread on a wire rack to cool completely, covering it with a clean cotton or linen towel.
 This is the recipe for rye bread in a bread machine. The finished bread is very aromatic and tasty, and when well cooled, it is easily cut into slices. As you can see, it’s not difficult to prepare, but you know what’s in it. And thanks to the fact that it is kneaded and baked in a bread machine, very little time is spent on it. Bon appetit!
The development of kitchen appliances has made the life of modern cooks and housewives much easier. At the same time, devices began to appear that require special preparation technology and a special recipe. For example, to which fermented malt is added, in a device such as a bread maker, it is prepared with a slightly changed proportion of ingredients. This is due to the fact that the cooking process occurs automatically along with kneading. Wherein regular dough has gluten, which allows it to quickly obtain the required consistency. But the dough, which uses fermented rye malt and peeled flour, has a completely different structure, which is very difficult to automatically knead. That is why such recipes should be refined, adapting them to modern household appliances.
Selection of oven
It should also be remembered that each company involved in the manufacture of kitchen appliances has its own assembly criteria and parameters temperature regime. Moreover, even different models of devices from the same manufacturer may differ in their characteristics. That is why you should select a recipe for each device individually. The bread described below will be baked in a Delfa DBM-938 bread machine.
Ingredients
To prepare you will need:
Wheat flour (second grade) - 500 grams;
Rye malt - 35 grams;
Peeled rye flour - 100 grams;
Dry yeast - 1 tsp;
Salt - 1 tsp;
Sugar - 1.5 tbsp;
Molasses - 1 tbsp;
Water - 300 ml;
Cumin - 3 grams;
Bookmark order

When the dough is made by hand, the order in which the ingredients are mixed does not matter much, although cooks are careful not to mix ingredients such as salt, yeast and rye malt. In a device such as a bread machine, products should be placed in a certain order, since this way the device will be able to properly prepare the dough in the allotted time. In this case, you don’t have to control it. First, a small amount of water is poured into the container, in which the salt is dissolved. Then add wheat flour. Sugar is poured on top and stirred a little. After this, add rye malt, molasses and peeled flour. Next, add yeast and add water.

Baking
After all the components are placed in the device, it is set to mode number one, intended for standard baking. They also select a program for the crust, and set the weight to 700 grams. After this, press the “start” button.
After a certain time has passed, the oven will beep. At this point, you need to put cumin in it. If the color of the dough is very light, you can add rye malt, but only in small quantities. Then the device is closed and the process is completed.
If you take out the bread immediately after baking, the crust will be hard and crispy. However, if you do not take it out immediately, but let it stand for at least twenty minutes, then it will turn out airy and soft.
1. Flour must be sifted.
2. Water should be used at room temperature.
3. Coriander can be used together with cumin.
I am glad to welcome everyone to my kitchen!
I suggest you look into the topic of how to cook homebaked bread in the oven. Today we will bake rye bread with malt. For everyone who likes simple homemade cakes, this recipe will definitely not be superfluous. In addition, the bread turns out so aromatic and tasty that you even want to eat it just like that.
Looking ahead, I will say that this recipe I made the recipe for rye bread myself, having previously looked through the many options offered. The result pleased me very much with its excellent taste, and besides, my homemade bread does not lose its freshness for several days, so it is with great pleasure that I share this recipe with you.
Recipe information:
Cooking method: baking in the oven
Total cooking time: 2.5 hours
INGREDIENTS
for rye bread with malt
- Rye flour – 250 grams
- White wheat flour – 150 grams
- Dry yeast – 2 teaspoons
- Purified water – 250 ml
- Granulated sugar – 2 tablespoons
- Kitchen salt – 1.5 teaspoons
- Malt – 2 tablespoons
- Vegetable oil (sunflower) – 2 tablespoons
HOW TO COOK HOMEMADE BREAD IN THE OVEN
According to nutritionists, rye bread is much healthier to eat than white bread. For my part, I will add that it is also much tastier.
Bread made at home with my own hands will give a head start to any purchase. After all, in a bakery all processes are performed by machines, but here in your kitchen you put personal positive energy into baking, and this, I tell you, is important for obtaining a delicious final result - aromatic homemade bread.
I don’t know about you, but I really like rye bread with malt. This additive gives baked goods special taste and excellent smell. The house is simply filled with some magical warmth and comfort!
Well, after a short introduction, let's get down to practical actions.
Our first step will be to prepare the main ingredient - flour. We will use not only rye, but also part of the wheat. The latter has the gluten necessary for baking bread. Without her participation, rye bread will be too dense and cake-like. That is why we use two types of flour (according to the recipe).
The next step is preparing the dough. It is this process that keeps homemade bread fresh and tasty in the oven for several days.
In a deep bowl, combine 3-4 tablespoons of white flour + dry yeast + granulated sugar - mix all ingredients.

Pour in the heated water (in no case hot) in full and mix until a homogeneous mixture is obtained.

We put our dough to ferment in a warm place. After about 20 minutes it will increase in volume and take on this appearance.

Mix our first dough for making rye bread and add malt to it.

Mix and add flour (a mixture of rye and wheat), add salt. Bring the dough to the consistency of sour cream. This will be the second dough.

And again we send her to a warm place to come up. This process will last from 20 to 30 minutes until the second dough takes on the following appearance.

Now it’s time to finally knead the dough for rye bread with malt. Gradually add flour and knead the dough, moving clockwise.

As soon as it gathers into a lump, dump it onto a floured surface. Immediately add the last ingredient - vegetable oil.

Constantly adding the rest of the flour, knead soft dough. In principle, the recipe for rye bread has been revealed and all that remains is to bake it.

Form the dough into a loaf and place it on a sheet of baking paper. Leave for a while (20 minutes) so that the future homemade bread rises a little more.

At this time, preheat the oven to 180 degrees. We send our bread preparation there (place the sheet in the center) and bake for about 25-30 minutes. Take it out and grease it on top vegetable oil(to form a beautiful crust) and put it in the oven again for 5-7 minutes, increasing the temperature to 200 degrees and turning on the fan.
At this time, the aroma of rye bread with malt will already fill your entire house, and you will understand that the baking process is complete.

Remove from the oven, transfer the loaf to a wooden board and cover with a linen towel on top. Let it cool down. Although it can be very difficult to resist immediately breaking off a piece, it smells really delicious!
Unsteamed bread with malt
An easy recipe for straight bread with malt in the oven.
Soft tasty crust.
Small bread weighing about 350g.
A simple recipe for beginner bakers.
In my opinion, bread and haste are two incompatible things. Either quickly or delicious bread. Sponge bread always tastes better and stores better.
Despite all doubts, I once tried to bake small bread with malt using the straight method. I was pleasantly surprised by the decent result. Now I bake it quite often.
This little malt bread is approved by everyone I know. I think that the taste and good porosity are the merit of the malt.
For the recipe, it is important to use no more than half a teaspoon of fast-acting dry yeast per 250 grams of flour, that is, no more than 1.5 grams.
You can read how to measure a small amount of yeast.
I use fast-acting dry yeast Saf-Moment, it is well suited for the straight-acting method.
Wheat bread with malt in the oven
Ingredients:
- Flour – 225-250 g – one and a half to two glasses – 752 kcal (for 1.5 glasses)
- Dry instant yeast – 0.5 teaspoon – 1.5 g – 6 kcal
- Water – 150-170 ml – ⅔ glass
- Sugar – 0.5 teaspoon – 3 g – 12 kcal
- Salt – 0.5 teaspoon
- Vegetable oil – 1 teaspoon – 45 kcal
- Fermented rye malt – 0.5 teaspoon – 2 g – 6 kcal
Calorie content of dough: 821 kcal
Finished bread weight: 340 g
Calorie content of 100 grams of bread: 241 kcal
Preparation:
1. Place approximately half a teaspoon of malt in a glass. Brew boiling water to a level of 2/3 cup (150-170 ml).
Add salt, sugar and vegetable oil, mix. Cool to a temperature of about 40 degrees.
2. Measure out 250 grams of flour, preferably using scales. Add half a teaspoon of dry yeast to the flour on top. Try the yeast. You can measure it with a medical spoon or use a syringe.
Knead the dough, gradually adding flour and yeast to the liquid mixture. Usually after kneading I have 5-20 grams of flour left from 250 grams. Sometimes all the flour goes away.
Finish on the table, knead until it becomes a soft ball.
If the dough is too sticky, do not rush to add flour, let the dough rest for 10-15 minutes (cover with film or a bowl) and then continue kneading, the dough will be more pliable.
3. Place the dough in a bowl. I have a liter saucepan.
Place the dough in a warm place to rise. That is, it increased by 2-3 times. The dough will rise like a head, and there will be a depression in the middle. This is the end. This may take 1-2 hours. The time depends on the strength of the yeast and the temperature in the kitchen.
I always use the pan system to rise the dough. Details.
4. Usually the dough rises after an hour and a half if something is being cooked on the stove.
5. Place the dough on a floured table and let it rest for 10-15 minutes under the bowl.
6. Knead the dough for about three minutes, shape it into a ball, and roll the bottom on the table so that the seam is better connected.
7. Place the ball in round shape at least 1 liter, I have an old stainless steel saucepan without handles.
Pre-grease the pan with non-stick mixture to make the bread easier to remove. By the way, a wonderful thing. I can’t even imagine how I used to live without her. The recipe for making it into potato bread.
You can shape it into a loaf and bake on a baking sheet lined with baking paper.
Place to prove in a warm place, I place it near gas stove on the desktop when something is being prepared there. I cover the mold with a plastic lid to prevent the dough from drying out. Proofing time is 40-50 minutes. If it's cold, then it may be more than an hour.
How do you know if the dough has proofed enough?
Gently test with your finger.
If the indentation from your finger is leveled out very quickly, the dough seems to spring back and the proofing is insufficient. If the bread is not sufficiently proofed, it may tear during baking. It happens that the crumb breaks out.
If the finger hole levels out slowly, you can bake.
With excessive proofing, the dough becomes completely soft and flaccid, and the finger hole does not even out at all.
Unfortunately, understanding the degree of readiness for baking comes only with experience. Neither video nor description will help here. Only experience. But he comes quickly. And cracked bread is just as tasty as bread without cracks, so don’t be upset.
I had a period when the bread was tearing too much when baking, and I could not understand the reason. One day I accidentally left the bread to proof for twice as long, I thought it was all gone – it wouldn’t rise. And it turned out great. It dawned on me that since it became very cold, we need to create heat or increase the proofing time. Since then, the main guideline is appearance bread, sometimes I leave it for 2 hours. And the Easter cakes, for example, sometimes don’t want to come up for three hours, and you have to wait.
In my opinion, excessive proofing can happen when the bread has risen and you are in no hurry to bake it. That's when it will start to settle.
8. After proofing is complete, use a sharp knife greased with vegetable oil or a blade to make cuts up to 1 cm deep on top of the bread.
9. Bake until done in a preheated oven at 230°C. I bake on the third shelf from the top. I'm above average by one department. Baking time 40-50 minutes.
You can bake first at 250°C for about 20 minutes, then reduce to 230°C. It will bake in 30-35 minutes. There will be a different crumb. More gentle. I like my bread drier and bake longer at a lower temperature.
Bake under steam for the first 20 minutes: place a stable cup or frying pan with boiling water on the baking sheet below, no more than 100 ml of water. After 20 minutes, carefully remove the container with boiling water so as not to get burned.
There is another method: carefully pour 50 ml of water onto a baking sheet, then you won’t have to take out the mug.
But your baking time may be completely different, depending on the nature of your stove. You have to master it.
10. Cool the finished bread on a wire rack. The top of the hot bread can be greased with butter or vegetable oil to soften the crust.
The finished bread gains its true flavor after 8 hours.
© Taisiya Fevronina, 2015.
INGREDIENTS
for rye bread with malt
- Rye flour - 250 grams
- White wheat flour - 150 grams
- Dry yeast - 2 teaspoons
- Purified water - 250 ml
- Granulated sugar - 2 tablespoons
- Kitchen salt - 1.5 teaspoons
- Malt - 2 tablespoons
- Vegetable oil (sunflower) - 2 tablespoons
HOW TO COOK HOMEMADE BREAD IN THE OVEN
According to nutritionists, rye bread is much healthier to eat than white bread. For my part, I will add that it is also much tastier.
And bread made at home with your own hands will give a head start to any store-bought one. After all, in a bakery all processes are performed by machines, but here in your kitchen you put personal positive energy into baking, and this, I tell you, is important for obtaining a delicious final result - aromatic homemade bread.
I don’t know about you, but I really like rye bread with malt. This additive gives baked goods a special taste and excellent smell. The house is simply filled with some magical warmth and comfort!
Well, after a short introduction, let's get down to practical actions.
Our first step will be to prepare the main ingredient - flour. We will use not only rye, but also part of the wheat. The latter has the gluten necessary for baking bread. Without her participation, rye bread will be too dense and cake-like. That is why we use two types of flour (according to the recipe).

The next step is preparing the dough. It is this process that keeps homemade bread fresh and tasty in the oven for several days.
In a deep bowl, combine 3-4 tablespoons of white flour + dry yeast + granulated sugar - mix all ingredients.
Pour in the heated water (in no case hot) in full and mix until a homogeneous mixture is obtained.

We put our dough to ferment in a warm place. After about 20 minutes it will increase in volume and take on this appearance.

Mix our first dough for making rye bread and add malt to it.
Mix and add flour (a mixture of rye and wheat), add salt. Bring the dough to the consistency of sour cream. This will be the second dough.
And again we send her to a warm place to come up. This process will last from 20 to 30 minutes until the second dough takes on the following appearance.
Now it’s time to finally knead the dough for rye bread with malt. Gradually add flour and knead the dough, moving clockwise.
As soon as it gathers into a lump, dump it onto a floured surface. Immediately add the last ingredient - vegetable oil.

Constantly adding the rest of the flour, knead the soft dough. In principle, the recipe for rye bread has been revealed and all that remains is to bake it.
Form the dough into a loaf and place it on a sheet of baking paper. Leave for a while (20 minutes) so that the future homemade bread rises a little more.
At this time, preheat the oven to 180 degrees. We send our bread preparation there (place the sheet in the center) and bake for about 25-30 minutes. We take it out, grease the top with vegetable oil (to form a beautiful crust) and put it in the oven again for 5-7 minutes, increasing the temperature to 200 degrees and turning on the fan.
At this time, the aroma of rye bread with malt will already fill your entire house, and you will understand that the baking process is complete.

Remove from the oven, transfer the loaf to a wooden board and cover with a linen towel on top. Let it cool down. Although it can be very difficult to resist immediately breaking off a piece, it smells really delicious!
So we figured out how to make homemade bread in the oven .
